Andrea Takes a (Long) Hike

In less than six months, my life will change dramatically in two big ways.

LIFE CHANGE #1: Introducing Dr. Pope

First, on May 7th, 2020–after 23 YEARS of formal education–I will finally be done with school. I cannot express how ready I am to close this chapter of my life! *laugh cries*

If you didn’t know, I have been pursuing a Ph.D. in educational assessment and measurement for the last 3.5 years. If you have no idea what that is (or just want to know what I’ve been up to in school), check out this short video of me explaining it!

LIFE CHANGE #2: A Walk in the Woods

After graduation, I will embark on the adventure of a lifetime. More specifically, I will be solo-hiking the Appalachian Trail (AT), which stretches all the way from Georgia to Maine!

42df71b6-3ae6-47ec-9564-f9f5f7c53bdb-3.jpg

Since making the decision to hike the AT, I have gotten a lot of questions from family and friends. Below, I’ve attempted to answer some of the most frequently asked ones.

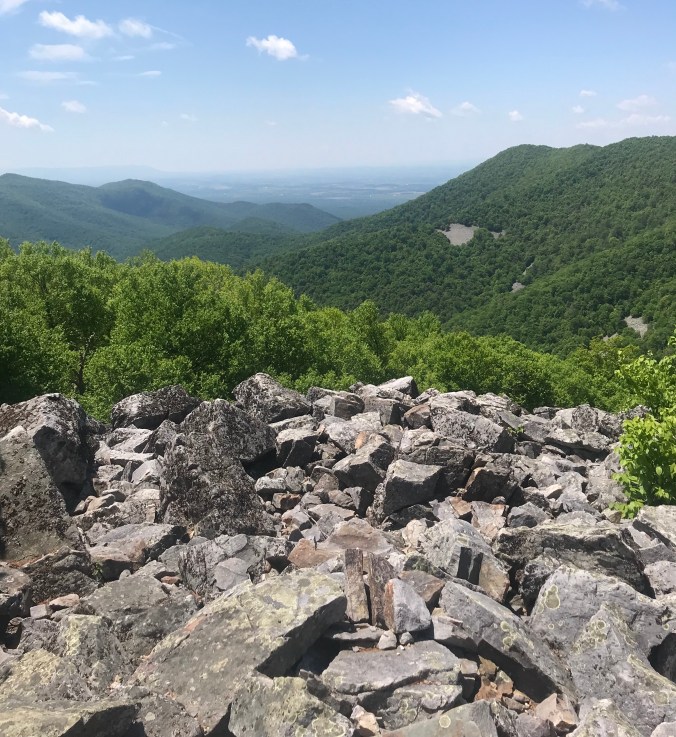
What is the Appalachian Trail?

The Appalachian Trial was completed in 1937 and stretches from Springer Mountain in northern Georgia to Mt. Katahdin in Maine. It is the longest hiking-only footpath in the world, at approximately 2,190 miles long. Over the course of those 2,190 miles, hikers walk through 14 states and experience over 460,000 feet in elevation gain/loss (the equivalent of hiking Mt. Everest, the tallest mountain in the world, 16 times).

How long will it take you to hike it?

The AT is typically completed in 5-6 months, with hikers averaging about 15-20 miles per day.

You’re going to be hiking by yourself?!?!?! Isn’t that dangerous?

It is common for AT thru-hikers start out alone, but few remain that way. Within a couple of weeks, many hikers find a “tramily” (trail family)—a small group of like-minded folk who naturally hike at the same pace and look out for each other. Even without a tramily, however, hiking the AT is not a lonely experience. Over three million people visit the AT each year, with upwards of 5000 people attempting thru-hikes yearly.

As for safety, I’m much more likely to be the victim of a crime while visiting a big city (or even just walking around tiny ol’ Harrisonburg) than I am on trail. But, of course, I will be taking a few reasonable precautions, such as carrying a small pocket knife and being sure to check in with family once per day.

But aren’t you afraid of bears/snakes/ticks???

Black bears are commonly found along the Appalachian Trail, but they generally do their best to steer clear of humans. In fact, many thru-hikers never see more than their backsides disappearing into the trees as they run away. Bear attacks are extremely rare and bear-related deaths are even rarer. Nonetheless, I have done extensive research on how to avoid bear encounters and what to do if I happen to come across one that doesn’t run away. The most important thing is to properly store all food/scented items (I’ll be carrying a bear-proof canister for that purpose).

In truth, I’m most concerned about ticks. Tick-borne illnesses can be brutal and hard to treat…and it only takes one small tick bite to transmit them. To minimize the risk, I will be sending all of my clothes to be treated with a long-lasting insect/tick repellant (permethrin). I will also be applying insect repellant (picaridin) daily and doing routine tick checks.

As for snakes, I’ll be sure to watch where I step and give them their space! But life-threatening snake bites are also extremely rare.

How are you going to survive for 6 months in the wilderness?

Generally speaking, every 4-7 days the Appalachian Trail runs through or near towns of varying sizes. In these towns, I will be able to shower, resupply, and even book a night in a hostel if I’m feeling fancy (i.e., not poor).

So, it’s almost like I’ll be doing a series of week-long backpacking trips. And I’ll carry on my back everything I need to survive those multi-day stretches outdoors (tent, sleeping bag/pad, clothes, rain gear, food/stove, water, first aid, and so on).

What have you done to prepare?

Aside from the dozens of hours I have put into researching gear and the trail, I have also completed a day-long course on how to read/use a map and compass and have completed over a dozen solo day hikes and one overnight backpacking trip. Before I leave next summer, I plan to complete at least ten more hikes and two more overnight trips.

3F061182-1017-40D1-A391-FF822050239D

Pictures from my 2019 hikes.

But Andrea, why would you want to spend six months roughing it in nature?

Several years ago, I read a book written by a clinical psychologist called The Defining Decade. In it, she talks about how to make the most of the “twentysomething” years and how to navigate many of the common struggles young adults face, such as picking a career path and dealing with imposter syndrome. One thing that really stuck with me from the book was the author’s reflection on how to build self-confidence. She writes:

A long run of easy successes creates a sort of fragile confidence, the kind that is shattered when the first failure comes along. Real confidence comes from mastery experiences, which are actual, lived moments of success, especially when things seem difficult.

In other words, confidence develops as a result of doing hard things and succeeding. It is not enough to succeed at the things that come naturally to you (in my case, school). To build a lasting, unshakeable self-confidence that can weather life’s failures and setbacks, you have to do the things that scare you. You have to challenge yourself again and again, and prove to yourself that you can rise to the occasion.

Undoubtedly, this hike will be an opportunity to disconnect, recharge, and recalibrate my priorities. But most importantly, it will be a chance for me to prove to myself that I can do hard things. Because if I can do this, I can do damn near anything.

How much does it cost to hike the AT?

You would think living in a tent would be cheap. But, as it turns out, thru-hikers actually spend about $700-1000 a month on trail (and that doesn’t even include the money required to pay bills at home)!

Some of the biggest expenses on trail are:

  • Food
  • Lodging (one hostel stay per week adds up)
  • Transportation (although hitch-hiking is common, many hikers prefer to catch shuttles to and from nearby towns when possible)
  • And gear replacements (did you know the average thru-hiker goes through 3-5 pairs of shoes?)

Lack of funds is one one the top reasons hikers fail to complete the trail, but I’m working hard to make sure that won’t be the case for me. I got a part-time job this year waiting tables at Olive Garden and so far, I’ve been able to save about $2000.

With that being said, if you would like to help me reach my $5000 savings goal, consider contributing to my GoFundMe as an early Christmas, birthday, or graduation gift. Your support means so much to me. ❤

Will you be documenting your time on trail?

Absolutely–for myself first and foremost, but also for my family and friends. My plan right now is to post to this blog site at least twice a month. I will also use instagram to share more frequent updates. If you want to be put on an email list to receive a head’s up when I make new blog posts about the trail, just let me know.


Welp, that’s about it! 2020 is going to be an absolutely amazing year. Thanks for taking the time to read about it, and I can’t wait to share my adventures with you.

With Love,

Andrea

How to Start a Home Yoga Practice

Image

Let’s be honest, even if I had the money to go to yoga classes several times a week (I don’t), it doesn’t always fit into my schedule. But attempting to build a home yoga practice with no guidance can be extremely intimidating. I know from experience. Luckily, after two years of practicing at home I’ve picked up some helpful tips and tricks. So if you’re like me and want to bring your yoga practice home, keep reading!


1. Go to a yoga class (or two or three).

The best way to start a home yoga practice is to take a few classes first. Try a variety of instructors and yoga traditions (ashtanga, iyengar, vinyasa, etc.) to get a feel for what you like and don’t like.

While you’re there, pay attention to the instructor’s cues about proper form in key postures like downward-facing dog and chaturanga dandasana. You won’t be able to remember everything, but feeling comfortable in these foundational postures will significantly boost your confidence in your ability to practice at home by yourself.

Finally, notice that you never start class with the most challenging postures first. You always build up to them. If done right, your body will be able to do things at the end of class that weren’t remotely possible when you first unrolled your mat. Keep this in mind as you start your own practice. If you try to force your body into postures without properly warming up, you won’t be able to go as deep and you’ll risk injuring yourself.

2. Get your gear.

While you really don’t need anything but your body to practice yoga, who am I to deny someone the joy of shopping for new goodies?  To get you started, consider picking up these basics:

  • Yoga Mat – Any kind will do. You may slide more on cheaper ones, but you can combat that by  keeping a towel nearby to dry your hands and feet.
  • Blocks – Depending on your level of flexibility, blocks may be necessary to attempt some postures like Extended Side Angle Pose. Don’t have blocks? Large books will do just fine for most things.
  • Straps – Straps can be helpful when working on flexibility in postures like Dancer’s Pose. Don’t have a strap? Use a belt instead!

*Tip: Wait to buy expensive clothes and gear until you’re established in your practice! Consider them a reward for practicing consistently. There’s nothing worse than dropping $200 on a new hobby and then moving on to something else two weeks later. Instead, wait to buy yourself that new mat until you’ve been practicing regularly for at least 3 months. 😉

3. Find online classes.

While it’s not essential to use online classes, for people like me who lack creativity when it comes to choreography and movement, online classes take a lot of the stress out of practicing at home.

There are tons of free classes on YouTube (try theses), but my favorites right now are: this paid plan on Cody App that focuses on building strength and this 30-day series designed to help you learn a different basic yoga posture each day (trust me, basic does not mean easy). If you’re interested in either, look out for sales. They’re pretty pricey, but I consider them a great investment since I have access to them forever and I no longer pay for in-person classes.

FullSizeRender

I like to mix and match different online classes to best suit my needs. Here’s a schedule I created recently which incorporates both of the paid plans above.

4. Push yourself, but listen to your body.

One of the greatest advantages of a home practice is you make the rules. But with this freedom comes its own set of challenges. You may find yourself wondering, am I doing enough? Am I doing too much? Based on my research and experience, here are some flexible guidelines that should help you get off to a good start:

  • If your schedule allows, try to get on your mat at least 3-4 days per week.
  • Incorporate at least one rest day each week.
  • Not sure if you’re doing enough? Ask yourself, do I feel challenged? Have I reached my limit? Can I give it one more try? While you don’t need to push yourself to muscle failure every day to see progress in yoga, it’s important to challenge yourself. To quote one of my favorite yogis, Kino MacGregor, yoga begins at the point when you start to doubt yourself and the practice. Pushing through this is a part of getting stronger.
  • Concerned you may be pushing too hard? Ask yourself, is my breathing shallow and uneven? Is my face scrunched up? Am I in pain? Have I sacrificed good form? Am I thinking negative thoughts towards myself? If the answer to any of these questions is yes, you may need to take a step back. And keep in mind, just because you were able to do something yesterday doesn’t mean you will necessarily be able to do it today. Listen to your body and accept what it can do at this moment.
Tips to Stay Inspired

Join the instagram yoga community!  Surrounding yourself (virtually) with amazing men and women who have dedicated themselves to their practice will serve as an endless supply of inspiration and motivation. Check out some of my favorite hashtags to begin connecting: #yogainspiration #yogachallege #yogaeverydamnday #yogisofcolor #beginneryogi. Oh, and follow me at @sheglitterslikegold!

Join an instagram yoga challenge. IG yoga challenges are another great way to motivate yourself to practice each day. Not only do you get to interact with hundreds of other yoga enthusiasts, but you have a very real chance of winning some cool prizes (in fact, during my very first challenge I won a chakra bracelet)!

Drop by a class. If your home practice has become non-existent and you’re really struggling to get back on your mat, sometimes going to an in-person class can rekindle your motivation. While you’re at it, invite a friend so you’ll have more incentive to go!

Track your progress. There’s no better way to stay motivated than to see how much you’ve improved. Progress can be mental or physical, just make sure you keep track of it! Instagram is a great place for that too. 🙂

While starting (and maintaining) a home practice can be difficult, I’ve found it to be a crucial part of my yoga journey. Once I took ownership of my practice, yoga stopped being something I did and became a part of who I am and how I view the world. My biggest piece of advice: don’t give up! And if you do, forgive yourself and begin again. None of us is perfect, but with a little dedication I promise you can have the home practice you’ve always wanted!

“Muscle Weighs More Than Fat!” and Other Weight Loss Myths Debunked

After falling off the #fitchick wagon utterly and completely this summer, I’m finally ready to get back in the game. For me that means yoga, weightlifting and food logging (follow me on Instagram to keep up with my progress!). While I’m super excited to be taking care of body again, rejoining the fitness community means dealing with a lot of crap—from fat shaming and unhealthy comparisons to “miracle” diets and TONS of misinformation. Since I can’t tackle all of that in one post, I’m going to focus on what’s been irking my nerves the most lately: myths about weight loss that are preventing people from being great.

MYTH #1: You MUST [eat five small meals/stop eating after 7/eat a large breakfast/cut out carbs/etc.] to lose weight.

The problem here is the word “must”. The only thing you MUST do to lose weight is burn more calories than you consume. Period. The end. No debate.

As such, the diet suggestions above are all just tools to help you do that.

For example, eating five meals a day or eating a large breakfast may help some people feel fuller and resist the urge to snack throughout the day. Similarly, cutting out carbs or setting a rule not to eat after 7pm may help some people reduce their overall calorie intake. For others, however, doing those things would make them absolutely miserable and they’d give up after two weeks. The takeaway here? Do what works for YOU.

In my case that means:

  • I eat three meals a day because a few large meals satisfy me more than several small meals.
  • I have a small breakfast around 11 am because I’m not very hungry in the morning.
  • I have a large dinner between 8 and 9pm because I’m prone to snacking at night when I’m home alone and late dinners help curb that.
  • I drink water 98% of the time because I prefer to eat my calories (and I like water).
  • I “count calories” because it takes the guesswork out of weight loss (no more crossing my fingers when I step on the scale). Specifically, I follow the 330-440-550 rule (my own creation lol). Basically, each day I can have one meal that’s 330 calories or less, one that’s 440 calories or less, and one that’s 550 or less. That totals up to 1320 calories a day (reasonable for my height and weight) and the meals I like to prepare fall perfectly within those guidelines.
  • Finally, I don’t specify foods I “can” and “can’t” eat. Instead I focus on total calories and macro-nutrients (protein, carbs and fat) because it makes me feel less restricted.
MYTH #2: Lifting heavy makes women look too “bulky” or masculine.

Please.

View this post on Instagram

The first wealth is health👌🏼

A post shared by Casey Currey (@buff_cookie) on


Just.


Stop.


Believe it or not, all of the women above incorporate heavy lifting into their workout routines—and they all look absolutely beautiful. So if you see a picture of an extremely ripped woman with bulging muscles (not that there’s anything wrong with that!), just know she’s probably flexing really hard and that’s not how she looks on a day-to-day basis. Case in point, here’s another picture of Tiffany (above) taken around the same time, only at a figure competition. Big difference, huh?


Not to mention, it would take a LOT of time, dedication, and hard work to build anywhere near as much muscle as the “scary” (read: awesome) women you’re thinking about. It definitely doesn’t happen over night.

In sum, all weightlifting is going to do is get you to your body composition goals faster. And maybe one day you’ll even be able to do superhuman things like this:


MYTH #3: Muscle weighs more than fat.

Ah, my favorite. We’ve all heard it before. It typically it goes something like this:

Alysha decided she wanted to get in shape. As her first order of business, she cut sodas, sweets and fast food from her diet. Next, she started going to the gym every day after work. She’s been avoiding the scale, but after four weeks it’s finally time to check her progress! To Alysha’s dismay, however, she actually gained two pounds. At first she was disappointed, but then she brushed it off. “It must be muscle. After all, muscle weighs more than fat!”

When Alysha says “muscle weighs more than fat”, what she’s really saying is “I’m sure I lost a lot of fat this month, but since fat isn’t very dense it probably only amounted to 3 lbs or so of weight loss. Meanwhile, I’ve gained a bit of muscle over the last month as well and since muscle is really dense it probably caused 5 lbs of weight gain, thus cancelling out what I lost.”

The problem is, the average man can only gain 1-2 lbs of muscle a month UNDER THE BEST CONDITIONS (that means eating and training like a professional bodybuilder), and for women it’s more like 0.5-1.0 lbs/month. So if you’ve been working out and eating right for four weeks straight and somehow you’ve actually gained 3 or 4 or 5 lbs, it’s NOT all muscle. Either you’re not burning as many calories as you thought you were (even Fitbits and heart rate monitors aren’t 100% accurate), or you ate more calories than you thought you did (yes, even calories from healthy foods “count”).

If this sounds familiar to you, no worries. There are plenty of resources on the internet to help you reach your body composition goals (note: health and body composition are NOT the same thing). My favorite is the no-nonsense, wonderfully sarcastic ACalorieCounter blog and it’s sister site, AWorkoutRoutine.

Both sites are HUGE so if you’re short on time, here are some of my favorite articles to get you started:

How Many Meals A Day? – When and How Often Should You Eat Daily?

Progressive Overload – The Key Workout Requirement

Best Cardio Workout – What Exercise Should You Do to Lose Fat

Happy Training!


Death to My To-Do List

A few weeks ago I wrote a blog post about a book I’d stumbled across and was excited to add to my reading list. Getting Things Done by management consultant and productivity expert David Allen, outlines a work-life management system developed around the premise that “your mind is for having ideas, not holding them.”

Allen works one-on-one with CEO’s and other high-ranking business professionals to help them organize their work and personal lives. Many of those top professionals swear by his methods, but I was curious how they would translate for little ol’ me.


First, a little more about the GTD system from David Allen himself:

“The methods I present here are all based on two key objectives: (1) capturing all the things that need to get done—now, later, someday, big, little, or in between—into a logical and trusted system outside of your head and off your mind; and (2) disciplining yourself to make front-end decisions about all of the “inputs” you let into your life so that you will always have a plan for “next actions” that you can implement or renegotiate at any moment.”

I finished reading the book last week and began the task of overhauling my organization system immediately. GTD consists of the following five steps:

1) Capture. Collect what has your attention. Use an in-basket, notepad, or voice recorder to capture 100% of everything that has your attention. Little, big, personal and professional—all your to-do’s, projects, things to handle or finish. – Getting Things Done

This was fun. The moment I started getting things out of my head, I felt lighter. Allen recommends using a physical in-basket for this exercise, but I was immediately put off by the thought of holding on to all that paper. It might make sense for those who have to deal with large amounts of paperwork as a part of their job, but for me a digital inbox was definitely the way to go.

IMG_3315

A screenshot of my digital inbox created using the Wunderlist app.

2) Clarify. Process what it means. Take everything that you capture and ask: Is it actionable? If no, then trash it, incubate it, or file it as a reference. If yes, decide the very next action required. If it will take less than two minutes, do it now. If not, delegate it if you can; or put it on a list to do when you can. – Getting Things Done

This step marks a huge departure from how I used to do things, but I welcome the change. Even though it’s only been a week, I can already tell making a habit of processing to-dos on the front end will be game changing. Some things I’ve noticed:

  • Because I know every bullet in my inbox will have to be immediately assessed for its next action, I am more selective about what I allow into my inbox in the first place. That means making the (sometimes difficult) decision to trash projects before I’ve spent weeks thinking about them and feeling guilty about not having done them.
  • Deciding on next actions immediately has gotten rid of a HUGE procrastination trigger. When there is no next action attached to a project, a cognitive gap is created. Every time you think about the project, there will be subconscious resistance to actually doing it because you can’t envision the first step. By expending the extra energy on the front end to determine what that step is, you’ll spend less time stressing about what you have to do and more time doing it.
  • The two-minute rule is magical. It also sucks. You’d be amazed how many daunting things on your to-do list can be jump-started with a mere two-minute action. You’d also be amazed at how much resistance you can generate towards a task that will literally only take two minutes. But when you put it off, you’ll probably spend a lot more than two minutes thinking about it. Since implementing the two-minute rule, I’ve moved forward on several neglected projects and finished a handful of others. It’s one of those things I love to hate, but it won’t be going anywhere.

3) Organize. Put it where it belongs. Put action reminders on the right lists. For example create lists for the appropriate categories—calls to make, errands to run, emails to send, etc. – Getting Things Done

Allen’s tips for organizing your to-do’s are gold. The lists are half of the magic of his system. With my old to-do lists, I sorted tasks in terms of the context in which they were received (school tasks, work tasks, personal errands). What Allen suggests, however, is sorting tasks in terms of the context in which you will be getting them done. That means I have an “In the Car” list for all of my out-and-about errands, a “Meeting w/ Boss” list that contains business I need to bring up when I’m with my boss and a “Study Time” list for when I’m in the library doing school work. As a result, whenever I’m in one of those places/situations I don’t have to think. I just go straight to the list and know exactly what needs to be done. The best thing about this is I have fewer of those darnit-I-was-just-at-the-store moments where I had the perfect opportunity to complete a task but completely forgot about it.

4) Reflect. Review frequently. Look over your lists as often as necessary to determine what to do next. Do a weekly review to clean up, update your lists, and clear your mind. – Getting Things Done

The GTD system only works if you check your lists religiously. This is something I’m notorious for not doing and it has already resulted in a few missed opportunities to get things done. My hope is that in time, checking my lists will become like a reflex. But until then I’ll focus on keeping them up-to-date so I can trust that when I do review them, I’m seeing all of my options. This should definitely keep me occupied as I’m always finding new loose ends.

5) Engage. Simply do. Use your system to take appropriate actions with confidence. – Getting Things Done

Organization has always been a weakness for me. For a long time I considered it something intrinsic (“I’m not an organized person”), and although I often experienced negative consequences because of this, I felt powerless to change it. Getting Things Done has shifted my perspective. I feel like I’ve been given the tools to create a more productive, less stressed, overall happier version of myself. Only time will tell whether the Getting Things Done methodology will stick, but considering the benefits I’ve already experienced, I’d be crazy to go back to my traditional to-do list.

To hear my thoughts on the GTD system 2 years later, click here!

6 Unexpected Things I’ve Gained While Losing Weight

weight-loss journey

Last summer, for the umpteenth time, I started a weight-loss journey. I made a commitment to myself, for the umpteenth time, to eat healthier and exercise more. A week later, the French fries (and Kit Kats and chicken wings) started calling. For the first time, I didn’t answer.

I don’t know what made this time different, all I know is once you start seeing progress, it’s addicting. I felt lighter, I slept better, my skin was clearer. My waist shrunk, my biceps grew, and my clothes fit better. These were all things I was expecting, and I took note of each physical change with pride.

But there were a plethora of changes I did not expect. Some were trivial, and others, life-changing. So without further ado, from small to great—what I’ve gained while losing:

My laundry is always done. I am notorious for letting dirty laundry pile up for weeks between washes. Funny thing about working out: you can’t do that with sweaty clothes (it also helps that I only own three sports bras). Since I started working out the time between washes has lessened to a week, making the ordeal much less daunting.

I have a routine. I’ll be the first to admit I’m not a naturally organized person, but when you only have 1300 calories to work with each day and five workouts a week to fit into you schedule, detailed planning is a must. Anything else is asking for failure. Before I go to bed I plan my meals for the next day and determine when I will work out. I pick out my clothes, get my gym bag packed and make my lunch. Creating these habits has made it easier to add on other new habits (like doing laundry every week!) and I must say, I like the structure. Doing things consistently at the same time means having to think less about the small things, leaving more time for the important ones.

I feel like Superwoman. There’s nothing like reaching a weight-loss goal to make you feel like you can do anything, because it represents a mastery of self. So often, we are our own biggest obstacle. So if you can master yourself – your thoughts, your feelings, your actions – you can master anything. This weight-loss journey has been about mastering myself from day one. And the more I lose, the more empowered I feel to not only improve myself but affect change in the world around me.

I have become okay with being uncomfortable. Every day for the past year, I have been uncomfortable. Whether while on the treadmill, or in the squat rack, or like now, while sitting in bed ignoring intense cravings for something sweet, being uncomfortable has become the norm. With weight-loss, it’s inevitable. It’s a prerequisite for progress. It’s when I’m the most uncomfortable that I know I’m pushing my limits and on the path to achieving something greater. It’s to the point now that I’ve become almost suspicious of comfort and ease. When exercising, if it’s easy it’s not effective. If I’m comfortable, I’m not improving. I definitely think this translates outside of the gym. Once you’ve become comfortable at a certain level, it’s time to move on.

I’ve learned to embrace my own weakness. Losing weight is downright hard. It requires pushing yourself and resisting temptation on a daily basis. Nevertheless, we often act like it’s easy. “No biggie,” we say, “I’ll just spend all day turning down my favorite foods and then run for an hour after work!” Our egos don’t let us think about the possibility of failure. If we want the results enough, we’ll do what it takes. If not, we’re weak. In truth, we ask far too much of ourselves. We set perfection as the standard and become disappointed when we inevitably fail. The reality is, we all have weaknesses. Either you plan for them or you succumb to them.

During my weight-loss journey this has meant shopping only when I’m full, planning my meals in advance, and scheduling my workouts for the beginning of the day. But it’s also spilled over into other areas of my life. For example, given my history, is it realistic to think I will have the energy to clean my house after a long day at work? I could convince myself while fresh from a nap that post-work Andrea will find the energy, or I could acknowledge that it’s improbable and find a more feasible option. It may seem like common sense, but people set themselves up for failure all the time because they want to believe the best of themselves so badly, they ignore their weaknesses. This journey has shown me just how much I’ve sabotaged myself with that kind of thinking. I’ve had to learn the hard way that my best chance of success comes from embracing my weaknesses, not denying them.

I have a deeper understanding of success. More than anything, what I’ve gained from this journey is the strong reinforcement of a simple truth: success is the sum of small actions. One day of weight training means nothing. One day of disciplined eating is pointless in itself. Success is not won through sporadic bursts of intense exertion, but through many days of consistent effort. What this means for me is placing less emphasis on end goals and more emphasis on daily behaviors. The behaviors are where success lies; achieving the goal is just a result. So instead of concerning myself with how much I weigh, I concern myself with how often I am able to stick to my calorie budget. And instead of making a 4.0 my objective for next semester, my priority is to develop productive habits. In short, I no longer view success as a state of being, but rather a state of doing. I can be successful independent of reaching a goal, and it is this intermediate success that will ultimately make my goals attainable.

It’s taken a year to get to this point, and it’s been difficult, for sure. But with everything I’ve gained, the journey has been more than worth it.